How to Test Your Sump Pump Before Spring Rains Arrive
Late winter rarely gives homeowners fair warning before it turns into spring. One mild week can send gallons of melting snowpack into the soil, followed immediately by relentless seasonal downpours. When that sudden surge of moisture hits, the ground quickly becomes saturated, driving hydrostatic pressure against your foundation walls and floor. The only barrier standing between a dry, functional basement and thousands of dollars in water damage is your sump pump.
Unfortunately, sump pumps often sit idle for months throughout late autumn and winter. Mechanical seals dry out, switch arms gather dust or mineral scale, electrical breakers trip unnoticed, and small stones or debris settle into the basin. Finding out your pump seized in November while standing ankle-deep in muddy water during a March cloudburst is an expensive way to learn about deferred maintenance.
Taking an hour on a dry weekend before the ground completely thaws gives you the breathing room needed to clean, inspect, and test the entire system under realistic operating conditions.
Understand How Your Sump System Operates
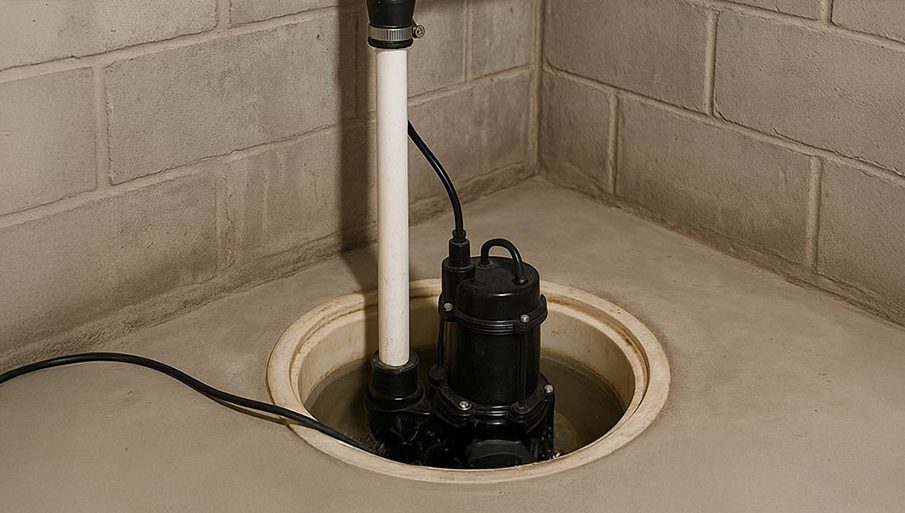
Before touching any valves or cords, familiarize yourself with the path water takes through the system. Subsurface drain tiles—perforated pipes buried along your foundation footings—channel groundwater directly into the sump pit, which is typically a plastic or fiberglass basin sunk into the basement floor.
Inside that pit sits the pump itself, usually either a submersible model submerged underwater or a pedestal model with the motor elevated on a tall shaft above the rim. As water fills the basin, a mechanical float rises with the surface level. Once the float hits a set trigger height, an internal electrical switch closes, powering the motor. The pump impeller spins, drawing water through an inlet screen and forcing it upward through a vertical polyvinyl chloride (PVC) discharge pipe.
Along that vertical run, water passes through a one-way check valve, continues outside the house, and discharges well clear of the exterior foundation walls. Every single link in that mechanical chain must work flawlessly for the pump to do its job.
Step 1: Examine the Power Source and Electrical Connections
Electrical problems are responsible for a surprisingly high percentage of sump pump failures during early spring storms. Begin your pre-season check right at the wall outlet.
Inspect the dedicated electrical line feeding the basin. Building codes require sump pumps to run on a dedicated circuit, typically protected by a Ground Fault Circuit Interrupter (GFCI) outlet. These outlets are notorious for tripping during nearby lightning strikes, power surges, or long periods of humidity. Press the test button on the outlet, ensure it snaps firmly, and press the reset button until it clicks back into place.
Next, trace the wiring down to the basin. Most modern submersible pumps use what plumbers call a piggyback switch plug. In this configuration, the pump power cord does not plug directly into the wall. Instead, the float switch cord plugs into the wall outlet first, featuring a two-sided outlet on the back of its plug. The main pump cord then plugs directly into the back of that float switch plug.
To verify the motor itself is not burned out or mechanically locked up, you can perform a brief direct power check:
-
Unplug both cords from the wall outlet.
-
Separate the main pump power cord from the float switch plug.
-
Plug the main pump cord directly into the wall receptacle.
The pump motor should instantly kick on with a steady, low hum. Never run the pump dry for more than two or three seconds, as water lubricates and cools the internal mechanical seals. Once you hear the motor spin up cleanly, immediately unplug the cord and reconnect the piggyback configuration exactly as it was originally assembled.
Step 2: Clean the Basin and Clear Physical Debris
Before you introduce water to test the float mechanism, look inside the basin with a bright flashlight. Over months of drainage, the water flowing through underground tiles brings silt, fine gravel, sand, and construction dust into the bottom of the pit.
If loose gravel or construction debris reaches the bottom inlet of the pump, the impeller can jam instantly. When an impeller jams, the electric motor draws excessive current, overheats within minutes, and trips the breaker or permanently burns out the motor windings.
Reach in with heavy rubber utility gloves and remove any visible rocks, stray pieces of plastic, drywall scraps, or wire ties. If there is a thick layer of silty mud resting on the bottom of the basin, lift the pump out carefully and use a wet-dry vacuum to suck the basin completely clean.
Inspect the base of the pump itself. Submersible pumps pull water through a screened intake or small openings along the lower housing. Use a stiff nylon brush to scrub away built-up algae, iron ochre deposits, and mineral scale from those intake ports so water can enter the chamber without restriction. When lowering the pump back into place, ensure it sits flat on a solid, elevated base—such as a specialized sump pump stand or a flat, unpainted concrete patio paver—rather than resting directly in loose silt at the bottom of the pit.
Step 3: Run the Dynamic Bucket Test
Manually lifting the float switch with your hand tells you whether the electrical contacts inside the switch close, but it does not tell you whether the pump can move real water volume under head pressure. The only definitive way to verify pump readiness is by simulating a real flood.
Fill a large five-gallon utility bucket with tap water. Slowly and steadily pour the water into the basin, simulating the natural flow of groundwater entering through the weeping tiles. You may need two to three full buckets depending on the diameter of your pit.
Watch the system carefully as the water level climbs:
-
Float travel: The float should rise smoothly without catching, tilting, or scraping against the plastic sidewalls of the basin or the discharge pipe.
-
Switch activation: Once the water reaches approximately six to eight inches above the base of the pump, the float should trigger the motor cleanly without hesitation.
-
Evacuation speed: The pump should pull the water level down rapidly, emptying the pit within five to ten seconds. The motor tone should remain steady, with no grinding, squealing, or violent shuddering.
-
Switch deactivation: As the water level drops, the float should travel downward and switch the motor off before the pump starts sucking continuous air. The pump should shut down leaving roughly two to three inches of water in the basin to keep the intake submerged and prevent air from entering the scroll.
If the pump hums loudly but the water level does not drop, shut the power off immediately. The impeller is either clogged, or the system has developed an airlock.
Step 4: Check for Airlock and Inspect the Weep Hole
Airlock is one of the most common reasons a perfectly functional sump pump fails to move water after sitting dry. When the pit drains completely, air can become trapped inside the pump impeller housing. When water fills the pit again, the pocket of trapped air prevents water from reaching the spinning impeller blades. The pump runs continuously, gets hot, but moves zero water because the blades are simply spinning in an air pocket.
To prevent this phenomenon, a properly installed sump system must have a relief hole—commonly called a weep hole—drilled into the discharge pipe.
Inspect the vertical PVC pipe between the discharge port on top of the pump and the bottom of the check valve. You should see a small hole, typically 3/16-inch in diameter, drilled at a downward 45-degree angle pointing back into the pit.
When the pump runs, a small, steady stream of water will spray out of this hole back into the basin; that is entirely normal and intentional. This hole allows trapped air to vent out of the housing so water can reach the impeller immediately.
If you locate the weep hole, poke a small wooden toothpick or a short length of stiff copper wire through it to clear out dried mineral crust, slime, or small stones. If your installation lacks this hole entirely, drill a 3/16-inch hole into the pipe roughly two inches above where it threads into the pump body, angling the drill bit downward so escaping water sprays safely into the basin rather than out of the pit.
Step 5: Verify the Check Valve Function
Directly above the pump along the vertical discharge line, you should see a cylinder clamped into the PVC pipe with stainless steel hose clamps. This is the check valve.
Inside the check valve sits a spring-loaded flapper that opens under upward water pressure and snaps shut when the pump stops. Its job is simple but critical: it prevents the water remaining in the ten-foot vertical pipe from crashing back down into the basin once the motor stops running.
Without an operational check valve, several gallons of water fall back into the pit every time the pump completes a cycle. This causes the water level to rise immediately, triggering the pump to turn back on just seconds later. This rapid cycling wears out the mechanical switch and destroys the motor within a single wet season.
Test the check valve by observing the pipe immediately after your bucket test:
-
When the pump shuts off, you should hear a dull, solid “thud” as the flapper swings shut against the seat.
-
Watch the water level in the basin. It should stay completely still. If the water level instantly jumps up several inches after the motor stops, the internal flapper is warped, cracked, or fouled with debris, and the check valve must be replaced.
-
Check the rubber sleeves and stainless steel worm-drive clamps on both ends of the valve. Snug down the clamp screws with a nut driver if you notice any moisture weeping past the rubber seams.
Step 6: Walk the Exterior Discharge Line
A sump pump can move fifty gallons of water a minute out of your basement, but if that water dumps out right next to your foundation, it simply sinks into the backfill soil and runs straight back down to the drain tiles. This creates an infinite recycling loop that burns out the pump and risks flooding your basement.
Head outside and trace the discharge pipe to its exit point:
-
Inspect for winter ice dams: In late winter and early spring, exterior pipes often freeze solid at the point where they exit the rim joist or meet the ground. If the outlet is packed with frozen slush or covered by a lingering snowbank, clear it away completely. A frozen pipe creates closed head pressure that will burn out a pump within hours.
-
Clear vegetative blockages: Autumn leaves, mulch, animal nests, and dried grass frequently clog the exit screen or pop-up emitter in the yard. Clear the opening and verify that the hinged grate swings freely.
-
Assess the discharge distance: Water should discharge at least ten to twenty feet away from your foundation, preferably downhill toward a street, swale, or dedicated drainage easement. If your current pipe empties within four or five feet of the house, attach a temporary corrugated drainage hose to direct runoff farther away until the ground thaws enough to install a permanent buried line.
Step 7: Test the Battery Backup System
Spring weather rarely brings heavy rain without accompanying thunderstorms, high winds, and falling tree limbs. Electrical grid failures frequently coincide with peak groundwater saturation. Relying solely on a primary 120-volt sump pump leaves your home vulnerable during the exact window when pumping capacity is needed most.
If your home is equipped with a secondary battery backup sump pump, testing it requires its own methodical sequence:
First, disconnect your primary sump pump from the wall outlet so it cannot run.
Second, locate the secondary 12-volt DC pump inside the basin. It is typically mounted a few inches higher than the main pump so it only triggers if the primary pump fails or gets overwhelmed by inflow.
Third, lift the float switch on the backup pump manually, or pour additional water into the pit until the backup switch triggers. Confirm that the backup pump kicks on instantly, that it evacuates water smoothly, and that the control box sounds an audible alarm notifying you that the backup system has been pressed into service.
Finally, inspect the battery itself:
-
If you have a traditional flooded lead-acid marine battery, check the electrolyte level in each cell and top it off with distilled water if the plates are exposed. Clean any white or blue-green powdery corrosion off the terminals using a wire brush and a mixture of baking soda and water.
-
If you have a sealed Absorbed Glass Mat (AGM) battery, check the status indicator lights on the intelligent charging unit. The unit should indicate a steady, fully charged status rather than a fault or charging error.
-
Keep track of the battery’s installation date. Marine and AGM backup batteries rarely last longer than three to five years. If your battery is entering its fourth or fifth spring, replace it proactively before the heavy rains arrive.
Recognizing Signs of Impending Pump Failure
Even with rigorous maintenance, sump pumps are mechanical workhorses that operate in harsh, wet, gritty environments. Most quality submersible pumps have an average service life of seven to ten years, while cheaper pedestal units or budget plastic pumps may degrade in five.
Watch for these warning signs that indicate replacement is necessary:
-
Excessive vibration or metal-on-metal rattling: This indicates a bent motor shaft or an impeller that has lost a blade after striking a stone, throwing the unit off balance.
-
Persistent electrical humming without pumping: If the weep hole is clear and the impeller turns freely by hand with the power disconnected, this sound signals failed starting capacitors or burned motor windings.
-
Rust and pitting on the housing: Cast-iron pump housings are exceptionally durable, but once corrosion breaches the outer seal, water seeps into the oil-filled motor chamber, causing catastrophic internal short-circuits.
-
Erratic cycling: If the pump turns on and off erratically despite proper float adjustment, the internal electrical contacts within the float switch have worn down or welded themselves together from repeated arcing.
Taking the time to clear the pit, cycle the motor with standing water, check the exterior line, and verify your backup power gives you complete confidence in your home’s defenses. A well-maintained sump pump works silently out of sight, keeping your foundation stable, your basement dry, and your home protected through the wettest spring storms.